Recently I was asked to help out on making some decorations for an engagement party with a rustic theme. The party was thrown in and refinished barn and used a lot of burlap and twine as accents. I had never really worked with burlap before so it was fun to work with a new material. First up on my project list was making huge wreaths by weaving strips of burlap in a wreath frame. I started out looking at some how to pages but really found they were all lacking good pictures or explanation so as always I ended up just going for it and working out the kinks as I went along.

I then vowed to take pictures and try and make a blog like I would have loved to had to help me get started. First step I folded a strip of burlap still on the spool (kind of like really wide ribbon) in half and wove it through the frame. For the pattern I created I went over,under,over under. This first strip with be totally covered by all the puffs to come and holds nice and tight so no glue or tying is needed.

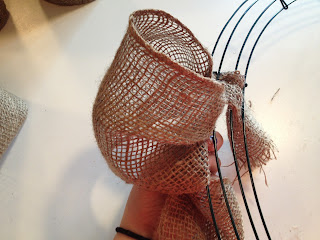
When you look at the wreath frame it is made of four wires that make ,what I will call, three rows. I took the burlap strip that was still attached to the spool and make a loop and pulled it through the outside row. You can make you loop and big or small as you want depending on how poofy you want your wreath to be. Once I made the loop and have it pulled out the the poof I wanted I twisted the burlap to lock it is place.

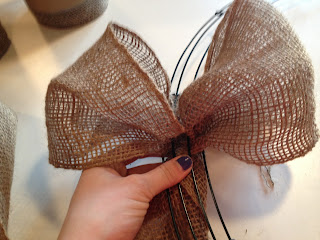
Next I made a second loop and pulled it through the inside row. Again I pulled it to my desired size and twisted the burlap to lock it in place.

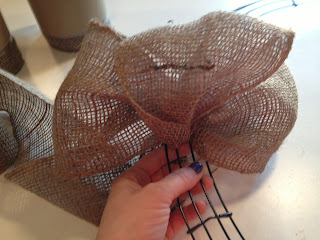
The last step in the pattern is to make another loop and pull it through the middle row, twisting it and locking it in place. Then this pattern is repeated over and over to fill up the whole frame. I found the outside, inside, middle sequence helped keep the wreath full and overall pretty even. Once I got into a groove it was actually a very fast project to finish up.
When I came to the end of a spool I would weave it through the wires like I did to start it off. Then I would start the next spool right next to it. The poof of the wreath completely hides your starts and stops

When the wreath was all finished I made some roses out of a lighter colored burlap for some contrast.
The start of the rose is a coil. This can be made to your own ascetic, small or big....loose or tight, and then you use a little hot glue to set it in place. Then to create the petals you fold back the burlap ribbon and hot glue it in place. Repeat this process to create the size you desire.
You can also play with the width of the burlap ribbon to create a variety of sizes.

Our other project was to create big burlap pom poms to hang from the ceiling using various sizes of paper lanterns. The first few we made from an idea someone found online. We created what seemed like HUNDREDS of small burlap circles that we glued in to little rosettes. Each rosette then had to be glued on to the paper lantern to cover the whole thing. It looked really cool but it took sooooooooooooo long.
After make 1 1/2 in this method I came up with an idea to create a similar effect with a fraction of the time.
For my version we cut the burlap into strips and gathered the fabric up on one of the center strings. This made a burlap ruffle that could be glued on to the lantern creating the 3D effect in a very short period of time.
I think the finished product was really beautiful.
The green burlap ribbon and light color roses really made the wreath pop! And I think they look great hanging on the big barn doors.


Comments
Post a Comment